All original work © Jason W. Wong. Please ask for permission to reproduce any work.

All original work © Jason W. Wong. Please ask for permission to reproduce any work.

Monday, November 29, 2010

I walk the line

When hanging art, I've been extolling the virtues of salon-style groupings to achieve an eclectic look and casual feel.

Why? Because it suits a variety of different frame styles, which is what a lot of my Retrograde clients have. And also because it takes away the pressure of having your art and photos spaced perfectly or aligned. For me, it's more important to get those pieces of art out of the storage boxes and up on the walls. However, the process isn't totally random. I like to use key lines to arrange art on walls. (That just means lining up certain edges of your pieces.)

Here are some examples (the key lines are marked in red):

In this example (above), you can see that the key line can also go down the center of several pieces.

Top and bottom key lines are easy ways to line things up, especially if you're really keen on maintaining order.

For this family gallery mockup, I layed out a 4' x 8' area of white space to simulate the portion of wall I was working with in a single family home. (When planning a grouping of so many photos or art, it can help to lay things out on the floor first...)

It's like a big puzzle, so go ahead and give it a try--play around! Like I said before, it's better than keeping your art and photos in storage. And if you mess up, just invest in a tub of spackle from your local hardware store to fill in the holes ;-)

Sunday, November 21, 2010

I see your true colors shining through...

One of my clients has been going through a lot of paint samples to see what will work in several rooms of their busy family home. I know that once they're ready to start painting the final colors, there will be some questions about the process. These same questions will pop up whether you decide to do the painting yourself or hire professionals. (I know--I've done it myself and I've worked with professionals through my dayjob.)

Luckily my friend Caroline Myers recapped the process step-by-step on her blog. Her instructions ensure that the color you choose from those tiny paint chips becomes the final color on your walls/cabinets/furniture/whatever. There are some extra steps that I didn't use 10 years ago when I painted my first "adult" bedroom, but trust me when I say that those steps are vital.

She used some kitchen cabinets as an example. Here's the BEFORE picture:


And here's the AFTER:


Here are her two vital tips to remember:

1. Get brush-outs of your paint samples. The paint chips at the paint store are not actual paint, so therefore there can be (and will be) color variances. Having a brush-out will give you an accurate picture of what color you are looking at.
2. ***THIS STEP IS KEY*** Once you have selected your paint color from your brush-out samples, order the paint and have them BRUSH OUT YOUR ACTUAL PAINT. This simple step can save you soooo much time. We spent two days getting an excellent paint job on our cabinets. We left for dinner to let them dry, came back and started putting in drawers and holding up the cabinets to get a sneak peak on the final picture. Once we held them up it was VERY apparent that we had the wrong color. We then painted some of our quart of paint to our original brush-out and sure enough the paint store had mixed it wrong. This color was incredibly blue compared to the color we had selected. So we had to spend an extra two days applying the correct paint color to the cabinets. So please please have the paint store brush out the actual paint so you can compare it to your sample brush out.

She has even more tips for painting cabinets or wood. Check out all the steps on her blog.

Monday, November 15, 2010

I've been looking so long at these pictures of you, that I almost believe that they are real...

Last week I showed how I customized a pretty basic piece of Ikea furniture. In the original post (about a young doctor on a budget) I also mentioned a bulletin board I created from another Ikea piece, the Ung Drill frame.

This week I want to show you how I created this:


This one is also really easy to do. I began with the $29.99 Ung Drill frame, which is basically a piece of black plastic--but it has a great shape. You could do this project with any thrift store frame.
I took out the glass and cardboard backing (save the cardboard--it's going to be the backing of your bulletin board.) I actually had some problem getting the glass out, but after I bent back the brackets holding it in place, I left it out in a cold space (my utility room) and by the next day the glass had contracted and came out easily.

Next, I used some metallic spray paint (Krylon metallics in Bright Gold) and gave the black frame one really light coat. After it had dried for an hour or so, I distressed the edges of the frame with some fine-gauge steel wool so parts of the original black came through. Then I used the glass (you can also use the cardboard backing) as a template for cutting out the fabric and other materials.

For the fabric (I used jute from Cliff's Variety, but you could use canvas, linen, or any other fabric), be sure to leave at least an inch of extra material so you can wrap it around the backing.


Originally, I was going to use cork as the "soft" material under the fabric, but the price of cork tiles and rolled sheets was a LOT more expensive than I remembered...so I used something else I had lying around: quilt batting. I realize not everyone has this stuff in their home, but once again you could recycle other materials for this. Maybe a bunch of old t-shirts or even denim...the point is to get about half an inch of padding so your thumbtacks won't go through the cardboard backing.

This material should actually be cut to the exact same size as the backing.


I actually used four layers of this particular batting (also originally from Cliff's) to get half an inch.

After I put the batting on top of the cardboard and wrapped the jute around everything, I simply used good ol' Scotch masking tape to take the extra jute down. I know it seems...ghetto. But it honestly works well. One of my old teachers at FIDM taught us how to wrap and tape fabric samples for display boards and it all came down to regular masking tape.

The entire process was quick--kind of a fun rainy day project (yes, it was actually raining when I did this--hard to believe with the current heat wave we're having!) And the finished piece is something that really suited this young woman's apartment and newfound style.

Sunday, November 7, 2010

You...doing that thing you do!

Last week my friend (and peer) Jolene asked me how I created the faux inlay on the Ikea Malm drawers. I figured some of you out there might want to know too, so I decided to write about the process this week.

Let's begin!

Step 1:
I use AutoCAD all the time to create furniture plans and construction documents, as well as for general space planning. So I figured it was the best way for me to draw a precise template for the inaly. Of course, everyone works differently. You could also simply draw it out on paper or cardstock using a ruler and a some circle templates, if that's easier for you.


Step 2:
If you do choose to use a computer program, you can tile your template so it will print over several pages. This means you can add cut/crop marks to multiple pages and then cut and tape them together into something larger--this is an easy way to print out something big using only regular pieces of paper at home. As you can see below, I was able to take this large drawer template (it was 31.5" wide) and print it onto five standard Letter-sized pages:


Step 3:
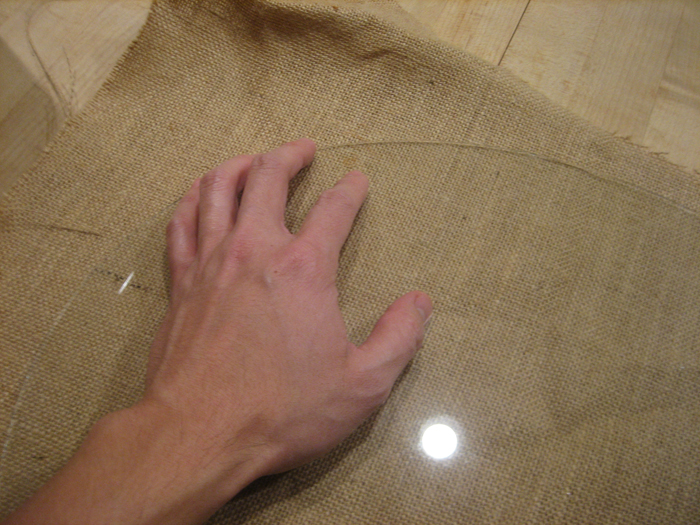
After taping the pages together to form a template, use an X-Acto knife or a utility knife (or even scissors or a razor blade if your template is simple enough) to cut it out.


As you can see here, I used an additional circle template to help me cut out the curved parts.


Step 4:
Then I rolled out some dark wood-patterned Contact paper ($4-6 a roll, depending on where you live) and taped my paper template on top. The back side of the Contact paper has these handy grid lines that really make it easy to draw/cut straight lines.


Then I traced my pattern onto the Contact paper and cut it out with my X-Acto knife.


Step 5:
I cleaned the surface of the Malm drawers with rubbing alcohol and then peeled off the backing of the Contact paper "inlay." Slowly, I stuck it on, smoothing out any bubbles that appeared.

Shazam! Customized Ikea furniture!


This week marks a change in the direction of my Retrograde blog. Y'see, last week I also had the chance to talk to another friend, the original co-founder of Retrograde, who is still pursuing the idea of transforming peoples' lives through health and bodywork. Over some happy hour drinks, she encouraged me to make the blog to more how-to and hands-on.

"That way you can reach even more of the young, stylish, crafty people you seem to be targeting," she said.

And later she added, "Then you can get a book deal, fool!"

Sounds like a plan.

Alright, Chronicle Books, I'm ready for ya.